Thursday, January 27, 2011

the pantry project

I spent only couple of hours organizing my pantry so it wasn't so bad. Here are some pictures before:

I already took some things out before taking the pictures but you have a rough idea that this needed to be dealt with. First I decided to line the shelves with a plastic liner intended for kitchen cabinets. I purchased mine in IKEA.

Then I divided my food into groups and decided which shelf to place them on. I have shelves that contain: kitchen appliances

Then I have the "baking shelf" 

the snacks

the "sweet tooth" pull out shelf

container shelf with pasta and rice and similar products 

and finally the can and bottles shelf. 

I still have one shelf open right now for any future need. 


This was fun!


organizing my pantry

after a year in my new kitchen, I am finally seeing things that don't work as well (and also I see things that only a genius could have come up with ;-) and so here i am trying to get inspired by some internet articles about how to make the best out of my pantry space. it is a bit difficult if you have narrow, deep shelves. here are some images that are inspirational to me.

I particularly like the lazy susans but i am not sure if i can fit it into my pantry. And the best idea ever? The can shelving could be very useful to me.
credit to: http://abowlfulloflemons.blogspot.com/2010/12/getting-inspired-to-organize.html

It is always useful to have your containers and shelves labeled. In that case your other half cannot make an excuse that the reason they didn't put the things back was they didn't know where it goes ;-)
I also like the see through containers - you can get so many of them in the Container store. And I am off to go shopping!


Thursday, January 13, 2011

french toast for breakfast

One thing about our breakfast menu? It can never be the same. We like variety during the week. We make cereal and porridge at least once or twice a week, but the rest is usually something different, more yummy.
One of my kids' favorite! 

FRENCH TOAST


you will need:
... desired amount of slices of bread (american)
... egg (1 egg per about 3 slices)
... 1/4 cup of milk
... cinnamon
... 1 tbs of butter
... maple syrup 
... bananas

break an egg onto a deep plate and mix in milk. stir it using a fork. sprinkle cinnamon and mix it in. take a slice of bread and dip it in the egg mixture covering both sides. then place the bread on the warmed up pen (hopefully your butter is nicely melted by now) and bake it on both sides until light brown. put it on a plate and pour maple syrup over it. finally, cut slices of banana and bon appetit! if you are making a bigger amount, get a deep ceramic dish ready next to your stove and place the bread in it after you bake it. make sure to cover it and it will keep warm for a while.

Tuesday, January 11, 2011

second chance at growing my first "second" avocado plant

so this is my first attempt to try to grow an avocado from a seed. It started out great - one out of two seeds sprouted almost immediately. First it cracked open and then a small root peek out of the shell. Within a month the root got pretty long and I was waiting for the small plant. But it wasn't coming and so i wanted to check on it. As I lifted the seed up, one of the toothpicks fell out and the potential avocado plant came crashing down to the ground, cracking in half...only never to live again.
And so after a few days of hope, I gave up because the only thing that happened was something white starting to grow on my tiny plant, I threw the first one away and started 2 new seeds in its place. I made fresh guacamole, washed the seeds and stabbed them through with the toothpikcs so that they can nicely hold up on the glass. After only few days I see a crack! i hope it is what I think it is because it seems to be a bit fast. But then, Maybe it feels sorry for me and therefor it's trying to hurry ;-) I will have to take pictures ;-)

Tuesday, December 21, 2010

wondering


I have been wondering about life perspective lately. you know when you were little kids you saw certain things in certain way and then you became teenagers and you saw those things differently. And then you became young adults and your view on the same thing changed again. Now you are an actual adult and you look back and you just can't believe in how many different ways you saw this thing. And it's a bit funny how clear it looks now and how much you can't understand that you didn't see it this way but instead you saw it through some fog or dark glasses. I am not sure if this makes you cry or laugh or maybe both. Sometimes it makes you sad because it feels like you just wasted so many years of your life.. and then it makes you laugh because... well you don't even know why it makes you laugh. But you know for sure that you wish you would have seen this thing for what it really is this whole time. I guess it's called life experience...


Thursday, December 16, 2010

the christmas tree that was outside


My daughter started snuffling one day last week. The next day it turned into more snuffles, and it was followed by red watery eyes and dripping nose. When finally third day her whole face swelled up and had red blotches all over. By that time i knew she wasn't getting sick. everything looked more like allergies. Now the only I had to do was figure out the reason for her allergy. This was first time she showed any symptoms close to this. What changed in our surroundings? The only that came to mind was our real... gorgeous... christmas tree. I googled christmas tree allergies and sure enough - it looked like I got it right. because we were just about to leave for a 3 day trip to a waterpark, we decided to wait with the tree distraction. After 2 days, her face cleared up and she was no longer looking like she was crying for many hours straight... And it is now with a sad heart that i have to say that we had to move our poor tree out of our house and it has a new residence - on our porch. We were all oh so sad but B is good now and can breath freely. As much as I am sad about it being out there... I was pleasantly surprised about the tree view tonight! it made my evening!!!


Monday, October 25, 2010


These are my radishes sometime at the beginning of September. I have never planted anything this late in the season so I am very anxious to see what the outcome will be. This is usually the time when I get a bit tired of taking care of my garden and I might be forgetting to water it. Oh boy I wish that will not happen. I had the seeds for a while so I wasn't expecting anything to come up but here they are.

Monday, October 19, 2009

turn that TV off

just thought I would share this article with all of you. I hate TV for my kids and I am always looking for TV free activities and I LOVED this article. I have been doing many of these activities already but it is always good to brush up on this and find some new tips. Happy TV free moments to all of you! 

http://www.parents.com/fun/activities/rainy-day/tv-free-activities/

Tuesday, October 13, 2009

classic for Halloween


here is a classic art project that is the easiest and the most fun for the kids as they can do most of it with only a little assistance from us.

what you will need:

orange construction paper
markers
glue
feathers
balls
you can also use other supplies such as glitter, crayons, buttons, etc... We are going to hang ours in the window therefor we made a pretty light pumpkin with no glitter as that tends to sprinkle all over the place. 

motor skills practice 

out of the orange construction paper, cut the shape of a pumpkin and give it to your child. Tell him that the pumpkin needs a face and he can make it however he/she wishes. Then give him all the other supplies and let him work the magic (with some assistance from you). I ended up with lots of glue for the eyes and nose ... and a huge smile - what else is here to ask for?

Friday, October 09, 2009

scarecrow


the best season of them all is here and we are off to farms with pumpkin patches, hay rides, and spooky stuff... also time to decorate the home with some fun fall projects. Here is the first one

what you need:

scissors
construction paper
markers
glue
optional decorating objects such as - glitter, feathers, stickers, foam letters, etc.

your child will practice using glue and markers (also good for developing motor skills) as well as naming shapes and possibly learn a new letter

cut shapes out of the construction paper - square for body, rectangles for arms and legs, circle for head, and triangle for the hat. you can use this to practice shapes - ask you child to find certain shape for certain part of the scarecrow's body. glue them all together into a person and have your child draw the face. Then you can decorate it with anything you choose. We used letter S for "scarecrow". I was making one at the same time so T was copying my actions. He did it all by himself. I think his is so much better than mine.

Wednesday, September 30, 2009

toilet paper people


what you will need:

toilet paper roll
foam or construction paper
pipe cleaners
glue
markers
scissors

let your child decorate the toilet paper roll as a body (we used markers but feel free to use anything else such as paint etc.), then make holes on the sides for arms and legs. Pull pipe cleaners through and cut them if needed to adjust length. Last cut out a circle for head out of the foam or constr. paper. before you glue it on the body, decorate as a face. Have fun!

Saturday, August 22, 2009

back from vacation


i have been back from my month long vacation for few weeks now but i needed some time to get adjusted back to our normal life. i feel like i am slowly getting there and i am hoping to be posting some new creative ideas to this blog. i am also going to create some portfolios on the sistv website and i am excited about it! but of course i need more time...always more time

Wednesday, June 17, 2009

garden art


garden art
Originally uploaded by imotylek
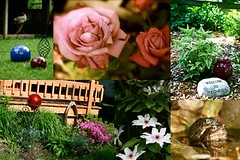
I love my garden and I think all the time about how much more time I need for it. I love little garden knick knacks and how much more life they add to your yard.
Gardening is like art - with each plant you plant, you create an art piece and with everything new around it the piece evolves into something new and bigger and more meaningful.
I am still learning - and it's a long process...

Saturday, June 06, 2009

paper towel painting


paper towel painting
Originally uploaded by imotylek
this is a quick and fun project for you and your kids. Please mind that I haven't bought a paper towel for years now but I borrowed it from a friend and that will work too.

what you need:

paper towel
cup with water
paint brush
and non-toxic water color paint for kids

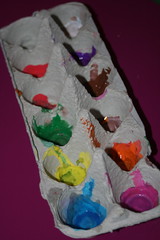
I put different paint colors into the egg carton holders and have Tristan paint on the paper towel. The more water he uses the better the paint mixes - but careful, you can tear it easily. Then just let dry. It is also a great tool to teach how colors mix together. Happy mixing!!!

Wednesday, May 13, 2009

sparkle this


sparkle
Originally uploaded by imotylek
This project is a little messy but it is one of our favorites... We are creating magic with some glitter!

What you need:
glue stick
glitter - many different colors
paper - white or construction paper
something under the table to catch fallen glitter (plastic, newspaper...)

- take the glue stick and draw with it on the paper. I drew a tree and Tristan made bunch of circles and lines. Take one color glitter and slowly sprinkle it on the glued surface. Shake the paper above the glitter jar so that the left over glitter falls back into the jar and you don't waste it.
- next draw something else on the same paper and use a different color glitter to sprinkle over... again, shake it of into the jar.
- you can do this as many times as you want to and you end up with a sparkly master piece!!! Just like we did!

Tip: the first time you do this project, show your child how to do it first and explain all the steps. Then he/she can do it on their own with your assistance.

Thursday, May 07, 2009

special art project


special art project
Originally uploaded by imotylek
what you need:

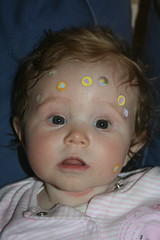
1 baby in the swing
sheet of Easter sticker (but any kind will do)
1 busy mommy making chocolate chip cookies (any activity will do)

...and here you go!!!

Saturday, April 25, 2009

oooops

So I experienced some "technical difficulties" as my hard drive crashed and I lost completely everything...all my documents, addresses, website data and of course pictures.... This is why i couldn't update my blog or my website for the past few weeks. I had some of you ask me and so here it is...this is why my blog has been so boring. My Mac is fixed, I even found my pictures on iTouch - Thank God for smart Apple gadgets so now we will be rolling again!!!

Oh and who thinks that Adam Lambert is amazing? I mean seriously - I am tuning in for AI every week now!

Thursday, March 26, 2009

green idea #1


green idea #1
Originally uploaded by imotylek
so here is a little tip to save you money and save the environment at the same time.

Instead of buying the plastic cups for paint, use an egg carton instead. I cut it in half and use the bottom part as a paint holder. I reuse it as much as possible.

Happy painting!

Wednesday, March 18, 2009

clay art


clay art
Originally uploaded by imotylek
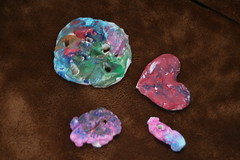
Sometimes I think Tristan is too little for some projects but I decided to try this one out when he was about 20 months. I bought the CRAYOLA AIR-DRY CLAY (you don't need oven for this project = less pain) and we both had an amazing time creating different shapes out of it. He molded some impressive shapes and we let them dry for a day or two. At that time I had an idea right away - we will use those little shapes as pendants for grandmas' necklaces (Christmas gift) so I made a hole thru them.

After couple days we sat back down with these little amulets, this time with some paint and brushes, and Tristan painted them!!! Don't they look adorable?

Last step was my turn - I took glaze and painted over the paint so that the pendants are shiny. Then we put them on a string that we picked out together in Hobby Lobby and presents were finished!!!

I smile every time I see either one of grandmas wearing theirs... and Tristan? He is soooo proud!!!!

Happy molding!

Sunday, March 08, 2009

beary good lunch


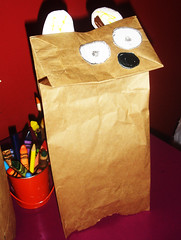
bear
Originally uploaded by imotylek
One morning when Bella fell asleep (just like usual the only time we have for anything :-)) Tristan and I pulled out our art supplies and got to work on something that will make daddy smile!

We took a brown paper bag (the one you can put sandwiches into), glue, scissors, markers and a regular paper. I drew the shapes for ears, eyes, and nose and Tristan colored them with a marker. I cut them out and he glued them to the bag. This is a great way to teach your kids how to use glue... Tristan made a bear and I made a cat.

After the bear and the cat dried we played a bit of a puppet show with them. This has been about a week ago and now they are old news... So we decided to surprise daddy tomorrow and pack his lunch in the bear puppet Tristan made! We know this will make him smile - we miss him all day!!!